
This new construction schedule template was designed to provide a very simple way to create a professional-looking road-map for multi-year projects. It is meant to be used for putting together an overview-type schedule for a project plan document rather than for ongoing project management.
Description
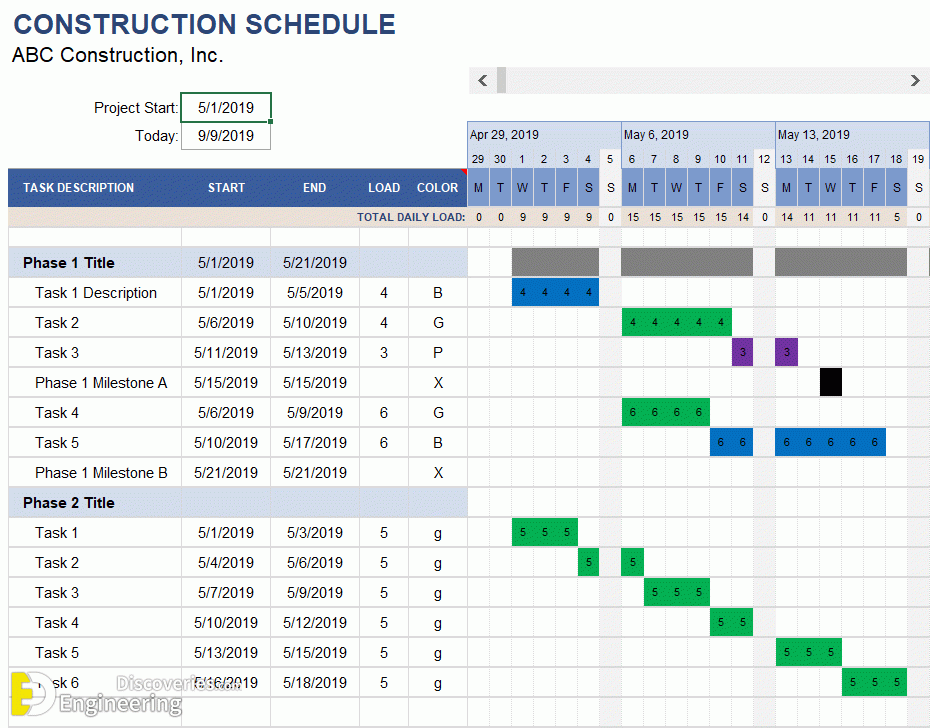
Besides displaying the Gantt chart on a daily basis, this version includes the ability to define non-work days and lets you specify the workload for each task. A summary of the total daily workload is displayed at the top.
Work Loading
Part of planning a construction project can involve figuring out how many people you need on specific days.
This version of the construction schedule shows how you can display and sum workloads. For each task, you assign a numeric workload in the “Load” column. This may represent the number of workers or some other quantity that you want to use as a metric.
The Gantt chart area uses a formula to display the workload for the task. A row at the top of the chart sums each column to show the total load for that day.
Using the Construction Schedule Template
Adding More Rows
When you insert new tasks, you should insert a blank row between rows that have the formatting you want. If you do that, the formatting will be copied automatically.
Enter Text Within the Gantt Chart
I designed this template specifically to allow you to enter the text within the Gantt chart area, and you can see an example of that in the screenshot above. The problem is that text does not move if you adjust the start/end dates. However, if you are just wanting something simple for a project plan you are putting together, this template can work great.
Text-based arrows or triangles such as ◀, ▶, ▲ and ▼ can be useful if you are adding text within the Gantt chart area. Hint: If you want to use these characters frequently, you could add Auto-correct options via File > Options > Proofing to automatically convert “(<<-)” into ◀ and “(->>)” into ▶. Or, you can just copy/paste these characters from the text within the Help worksheet.
You can add shape objects and text boxes in Excel by going to Insert > Shapes, so what you can do to label your construction schedule is almost limitless. However, adding text boxes and shapes is a manual process and the objects won’t move if you adjust the start/end dates.
Adding More Columns to the Gantt Chart
If you want a construction schedule that can span a time longer than 5 years, you can copy the last 12 columns in the Gantt chart and then paste the copied columns to the right of the Gantt chart.
Changing the Bar Colors
The TYPE column can be used to choose a colour for the bars in the schedule. If you want to change how these columns works, you will need to edit the conditional formatting rules.
Conditional Formatting
If you want to edit the colours used in the Gantt chart, you will need to edit conditional formatting rules.
To edit conditional formatting rules, go to Conditional Formatting > Manage Rules and select “This Worksheet” to see and edit all the rules.
Creating Dependent Tasks
When creating a project schedule, you often want to start one task when another task ends, and when you are creating your construction schedule, you probably want to set things up so that you can change a single start date and have all the other dates automatically update.
The simplest way to create a dependent task in this construction schedule is to use a formula for the start task such as =end_date+1 where “end_date” is a reference to the end_date of the predecessor task (so the formula might look like =C9+1.
The following formulas are examples of what you can enter into the Start Date to create dependencies on a predecessor task:
1- Start Date is the day after the predecessor’s end date
=end_date + 1
2- Start Date is the next Work Day after the predecessor’s end date
=WORKDAY(end_date,1)
3- Start Date is 10 workdays before the predecessor’s end date
=WORKDAY(end_date,-10)
Entering the Task Duration Instead of the End Date
Gantt Chart Template Pro is designed to make creating dependent tasks easier and to allow you to use either calendar days or workdays to define a task duration. But with a few Excel formulas, you can add some advanced functionality to even this simple construction schedule template.
Here are a few formulas that you could use in this template to define an end date. You can look up the WORKDAY and WORKDAY.INTL functions in Excel help to learn more about how to use them.
1- End Date is 50 days after a start date
=start_date + 50
2- End Date is 50 workdays after the start date (excludes Sat & Sun)
=WORKDAY(start_date,50)
3- End Date is 50 workdays after the start date, using a custom work week and holiday list
=WORKDAY.INTL(start_date,50,weekend,holiday)
4- End Date is 3 months after a start date
=EDATE(start_date,3)5- End Date is 12 weeks after a start date
=start_date + 12 * 7
Click Here To See Download Planning And Schedule Free Templates
Loading related articles...
Loading recent articles...
Loading featured articles...
