
Concrete slump testing is a crucial field method to determine the workability and consistency of concrete before it is placed. This simple yet effective test ensures that the concrete mix has the desired fluidity and will perform optimally in its intended structural application. Below, we present a comprehensive, detailed, and actionable guide on how to execute the concrete slump test to achieve accurate and repeatable results on-site.
Understanding the Importance of Concrete Slump Test
The slump test for concrete is a key quality control procedure used in construction projects. It helps assess concrete’s consistency, cohesiveness, and workability, ensuring it meets engineering specifications for strength and durability. Consistency in concrete is critical, affecting placement, compaction, and on-site finishing operations.
Equipment Required for Slump Testing
Before conducting the test, ensure the availability of the following standardized equipment:
To ensure accurate results, all equipment should be clean and free of hardened concrete residue.
Step-by-Step Procedure for Testing Concrete Slump
Step 1: Filling the Slump Cone – First Layer
Begin by placing the metal slump cone on a level, non-absorbent surface. Firmly hold it down using footrests or handles and oil can be applied on the surface. Fill the cone one-third (1/3) by volume with freshly mixed concrete. Using the tamping rod, rod the concrete 25 times uniformly, ensuring penetration throughout the cross-section.
Step 2: Second Layer Filling
Add a second layer of concrete to two-thirds (2/3) full volume. Again, rod this layer 25 times, allowing the rod to penetrate through the second layer and into the first to consolidate both layers adequately.
Step 3: Final Layer Filling and Leveling
Fill the cone to the top (overflowing) with concrete. Rod it 25 times, but ensure the rod does not penetrate into the second layer excessively. After rodding, remove the excess concrete using a trowel or the straight edge of the rod to create a level surface flush with the top of the cone.
Step 4: Lifting the Cone
Carefully lift the slump cone vertically upwards without tilting or twisting. This must be done smoothly in 5 to 10 seconds. The concrete will slump down under its weight. The slump cone should be lifted without applying any lateral or twisting motion, which could affect the slump measurement.
Step 5: Measuring the Slump
Immediately place the empty cone next to the slumped concrete sample. Place a straightedge across the top of the cone, and measure the vertical distance from the underside of the straightedge to the highest point of the slumped concrete. This distance in inches (or millimeters) is the slump value.
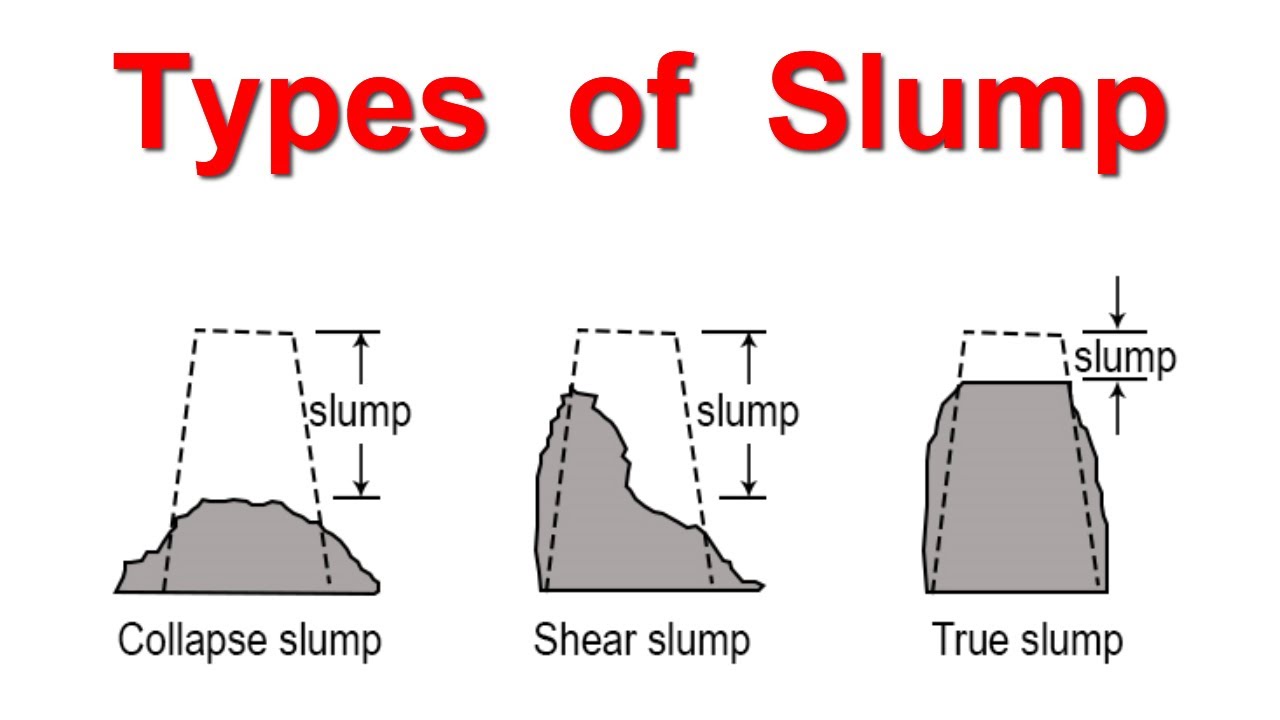
Types of Concrete Slump Observations
The shape and height of the slumped concrete give valuable insights into concrete behavior:
Acceptable Slump Values for Different Applications
| Concrete Use | Recommended Slump |
|---|---|
| Pavement Construction | 0 – 25 mm |
| Foundations, Footings | 25 – 75 mm |
| Beams and Slabs | 75 – 125 mm |
| Columns, Walls | 100 – 150 mm |
| Pumped Concrete | 150 – 200 mm |
Always adhere to the project-specific slump requirements as outlined in the specifications or codes.
Factors Influencing Slump Results
Several factors can affect the accuracy and repeatability of slump test results:
Best Practices for Accurate Slump Testing
Limitations of the Slump Test
While the slump test is widely accepted, it has limitations:
Standards and Codes of Practice
The slump test is standardized globally by multiple organizations, including:
Conclusion: Ensure Concrete Quality with Accurate Slump Testing
Consistent slump testing plays a pivotal role in ensuring durability, strength, and long-term performance of concrete structures. By following the standard procedure, we can achieve uniformity in concrete mixes, reduce structural defects, and ensure compliance with design standards. Mastery of this simple test empowers engineers and field professionals to maintain rigorous quality control on construction sites, leading to safe and resilient infrastructure.
Click Here To See Essential Guidelines For Civil Site Engineers And Supervisors
Loading related articles...
Loading recent articles...
Loading featured articles...
